Endpoint Privilege Management deployment guide
Introduction
Microsoft Endpoint Privilege Management (EPM) is a part of the Intune Suite offering. It allows standard users to run applications with privilege rights, without the need to be local administrators. This is a massive security improvement and supports your zero-trust strategy. At core, with EPM you can:
- 📈 Allow users to run apps, files and code, based on indicators with elevated rights
- 🔐 Stay compliant to the just-enough access principle and only allow users to run code elevated, that you (the IT admin) specifically configures
Use cases
EPM empowers for specific use cases and helps to reduce IT resources and making end users more productive and autonomous. Here is a list of common use cases across organizations:
- Elevate a specific line of business application
- Install software, drivers or tools with elevated permissions
- Give elevated permissions (even system-wide) without local admin group membership
There are still a lot of applications that require privileged rights in some way. Especially for the installation of software on Windows in the system context requires such rights (for good reason). In general, I advise to package all software and deploy it through Intune. With that, no manual installations are needed.
EPM in a nutshell
- ⬆️ Elevation rules are defined per file, identify and detect through file hash or certificate and other attributes
- 🪶 Easy configuration in Intune: Agent is automatically deployed, once a EPM policy is targeted to a user/device group
- 🧩 Integrated option when in the "right click" context menu of Windows
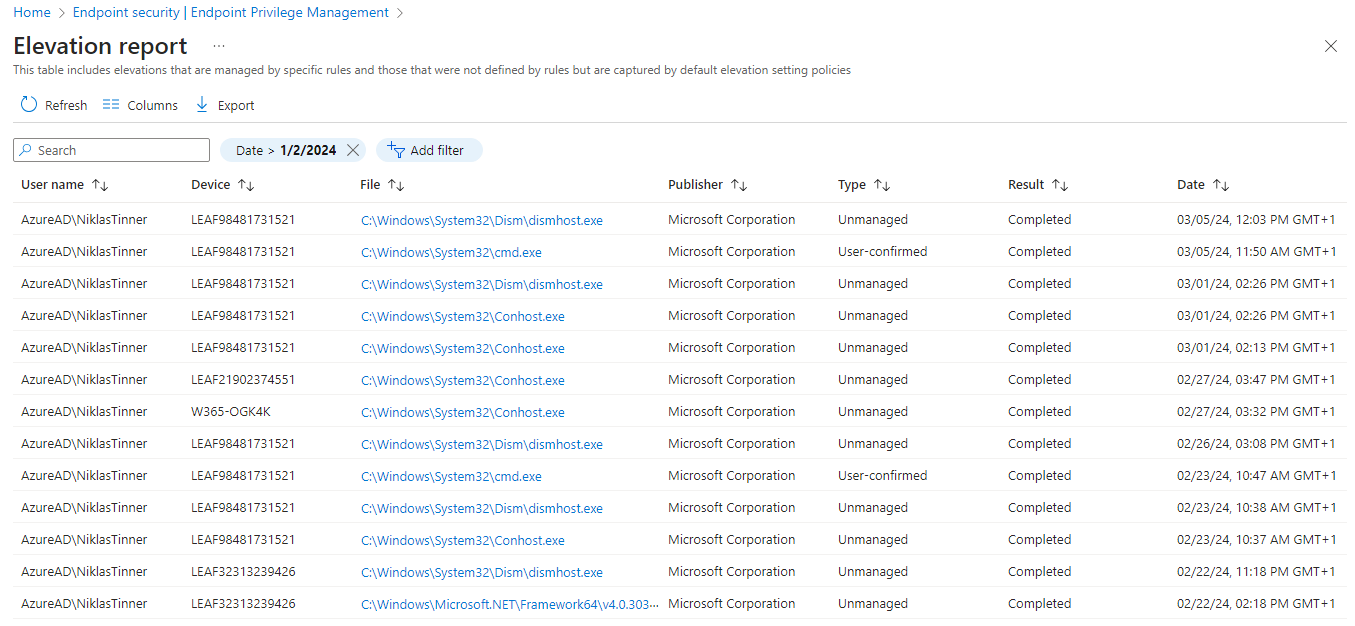
- 🔍 Review reports on managed and unmanaged elevation and other filters in Intune
- 🛟 Use support-approved mode so that end users can request elevations for apps and admins need to approve them
Setup
Prerequisites
- Licenses: Intune Suite or standalone add-on / you only need to license users who use EPM
- You need an Intune administrator role to configure all aspects (custom Intune roles possible)
- Latest Windows version
- Device is Intune enrolled and Entra joined (+ Windows 365 is supported, AVD not yet)
- Verify the required network endpoints are available
Before you start
- One elevation settings policy can be configured, but multiple elevation rules can be configured (they do not conflict)
- User or device groups are possible to target
- Only deploy EPM policies to users that have an EPM license
- Include one or multiple rules in one elevation rules policy
- EPM only supports '.exe','.msi' and '.ps1' files at this time - if you are looking for a way around this, check out my other post:
Policies
2 policy types are required to deploy the functionalities of EPM to your endpoints:
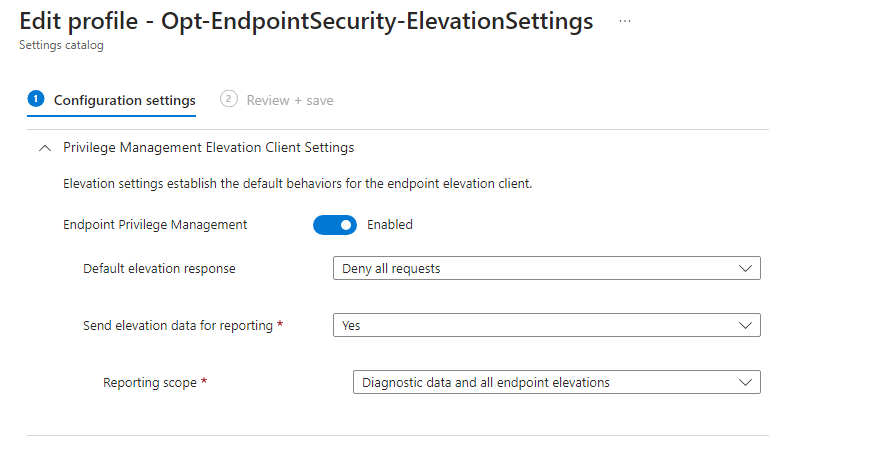
- ⚙️ Elevation settings policy > the behavior of EPM on the systems, contains reporting, default elevation response and validation
- 👮 Elevation rules policy > the policies that contain entries of files that are allowed to elevate with EPM
To create the policies, navigate to Intune > Endpoint Security > Endpoint Privilege Management
Elevation rules file indicators
By configuring the elevation rules with indicators that identifies a specific software, you should follow a few important principles:
- 🎯 Specify the application as precisely as possible by defining as much attributes as possible
- 🤔 Think about changing file attributes, such as the file hash or version
- ⚠️ Always consider, how someone could bypass your EPM elevation rules + indicators
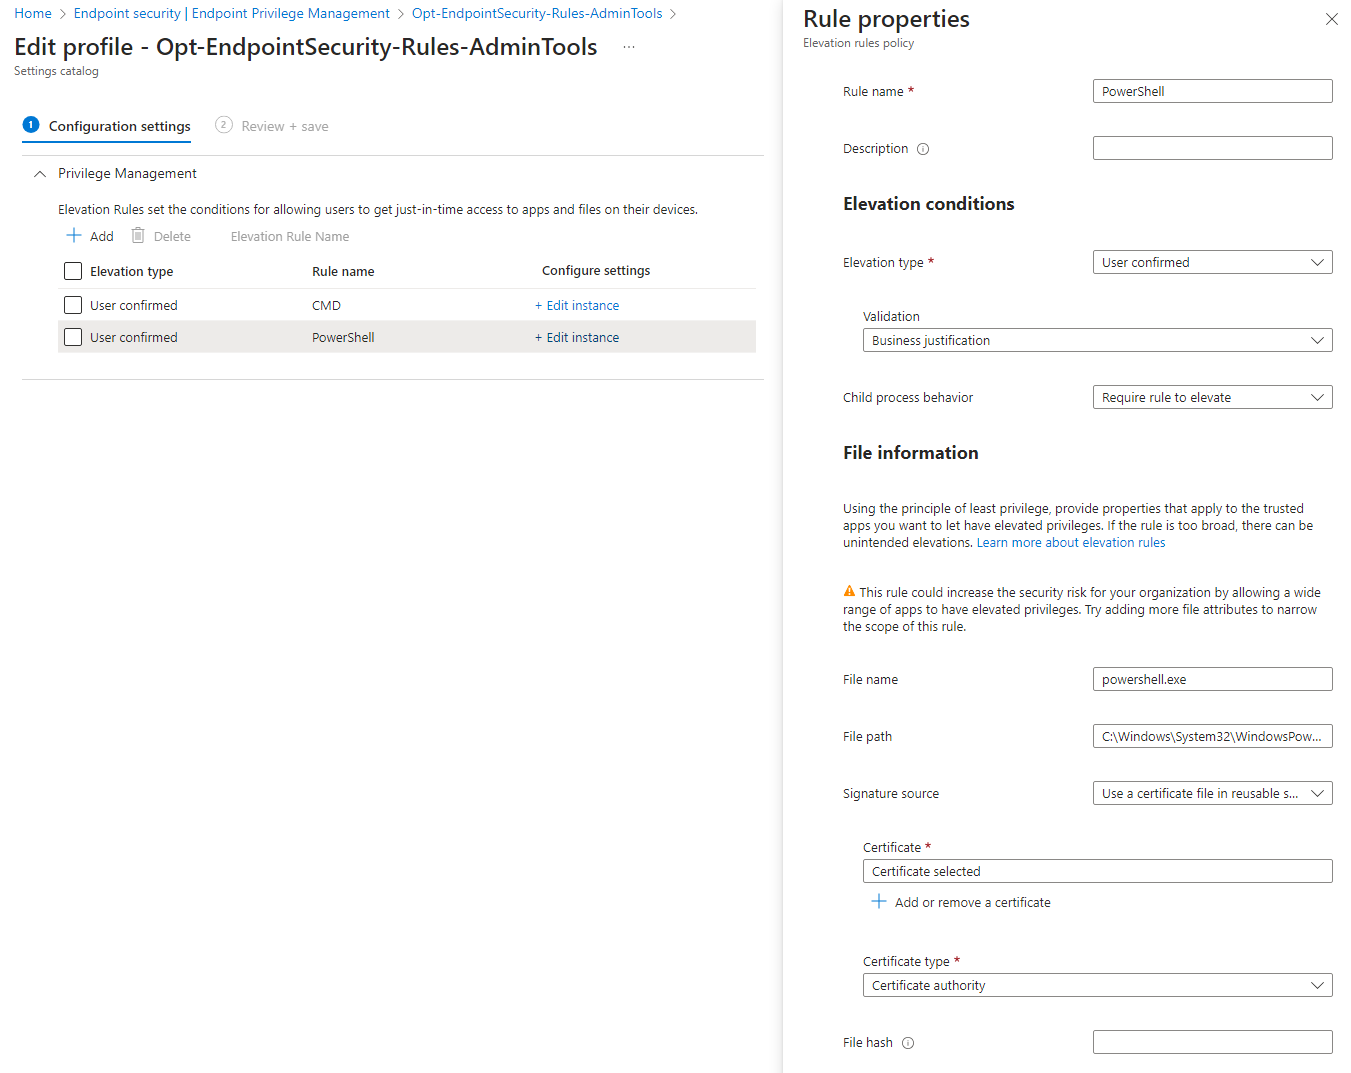
Elevation conditions
For each and every EPM rule, you can define the conditions, behavior and settings of elevation per app.
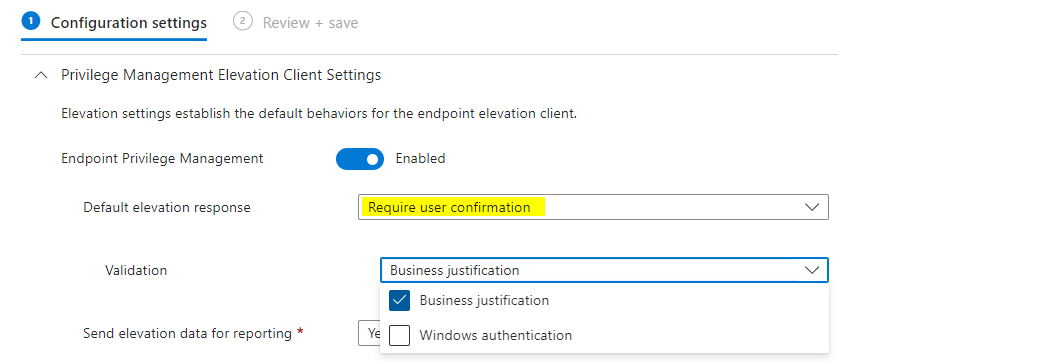
- Elevation type
-User confirmed = user needs to supply additional validation
-Automatic = no additional validation, automatically open
-Support approved = user sends request, then IT admin can review it in Intune portal and approve or decline
- Validation (only for user confirmed elevation type)
-Business justification = free text that the end user needs to provide a justification that gets reported back to Intune admin reports
-Windows authentication = provide credentials like Windows Hello for Business or password for additional verification (think of this like MFA)
- Child process behavior
-Allow all child processes to run elevated = all subsequent processes will be elevated (⚠️ be careful with this)
-Require rule to elevate = other EPM rule must be existing in order that child processes are also elevated
-Deny all = no subsequent processes will be elevated
Indicator options
The following indicators are possible to define and target apps:
- File name
- File path
- Signature source from publisher or certificate authority (possible from reusable settings, where you upload the certificate just once and use it for multiple policies)
- File hash
- Minimum version
- File description
- Product name
- Internal name
Get indicators
Once the EPM settings policy is deployed to an endpoint, you can use the EPM PowerShell module for some important tasks like getting file information. Import the module with:
Import-Module 'C:\Program Files\Microsoft EPM Agent\EpmTools\EpmCmdlets.dll'Then use it to get information for any file you want:
Get-FileAttributes -FilePath "<insert path to app>"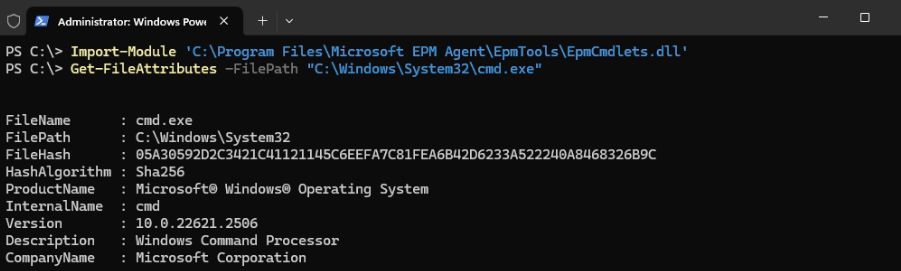
When you want to get a certificate that is used to sign an app, you either check the Properties > Digital Signatures > Details > View Certificate or use the following PowerShell code:
Get-AuthenticodeSignature <insert path to app> | Select-Object -ExpandProperty SignerCertificate | Export-Certificate -Type CERT -FilePath <path to output certificate.cer>Support approved mode
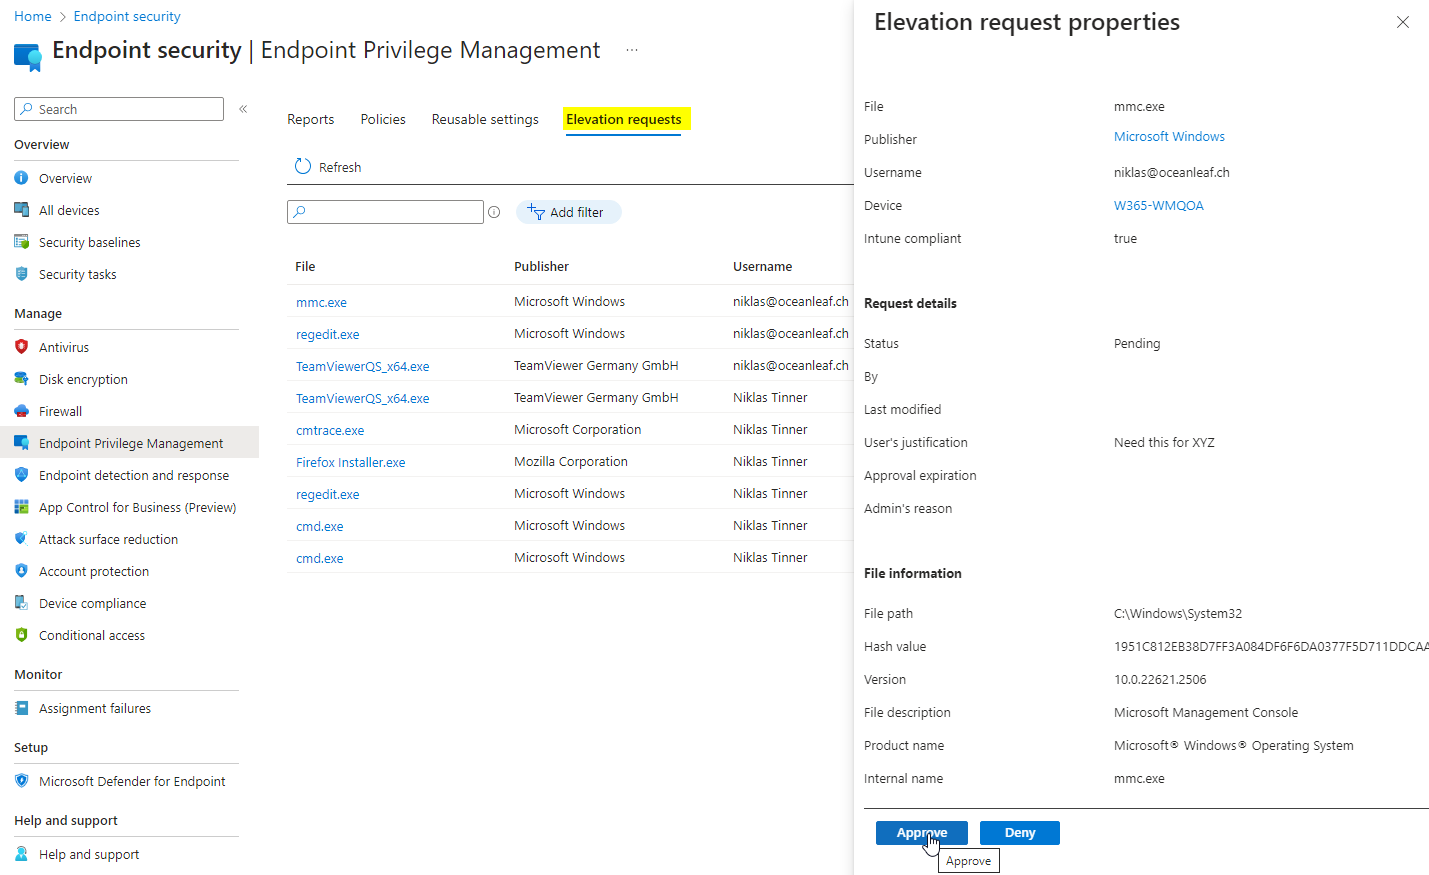
With a later release of EPM the support approved mode was released. This allows EPM to be even more widely used and brings helpful additions when it comes to elevation. The process with support approved mode looks like:
- The end user can request a specified or any (if you want any then you need to configure the EPM settings policy with the default elevation response) app to open with elevated permissions ❗Note the difference here, which is the "Send" instead of continue button
- The IT admin with permissions in Intune can review requests at Endpoint Security > EPM > elevation requests
- The IT admin approves the request
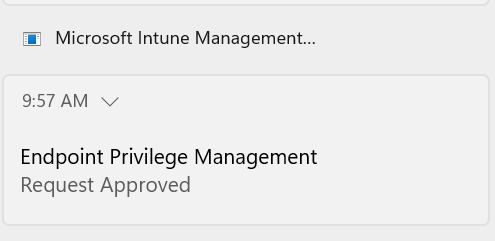
- The end user receives a toast notification within a few minutes and can then run the app elevated ❗Note the "Continue" button instead of send
- The user could run the app elevated within 24 hours after the request was approved


Demo
Below you get a few impressions of how EPM looks like from an admin perspective with the elevation settings policy and elevation rules policy, plus reporting.
The end user can 'right-click' any application and a new option 'Run with elevated access' will be shown in the context menu. If there is an elevation rules policy for the corresponding app, EPM will work and ask for additional validation (if configured). At 'C:\Program Files \Microsoft EPM Agent' all client components should be located at.
Notes from the field
Implementation approach
It is a good idea to start with some analyzation of what your users need to elevate. For that you can leverage the following:
- EPM settings policy that reports all elevations (managed or unmanaged) back to the Intune portal
- Use Defender for Endpoint Advanced Hunting queries to view elevations
- Use a third-party tool to review endpoint elevations
- Do field research about what your corporation end users need to elevate
System wide elevation
For special personas such as developers, system wide elevation rights might be required to elevate whatever code needs to be elevated. This is possible by configuring one endpoint privilege settings policy as follows:
Policy design / targeting
I recommend to assign the policies to a user group. You can also apply the EPM license to the same user group. Filters are not supported, yet.
Furthermore, I would only create one instance per elevation rules policy and assign this to a user group that requires that specific use case. Also for intermixing policies to use cases, that is easier. Create 1 group and link it 1:1 to one EPM rules policy.
powered by
 Niklas Tinner